Category Archives: Geometry

A Coordinate System

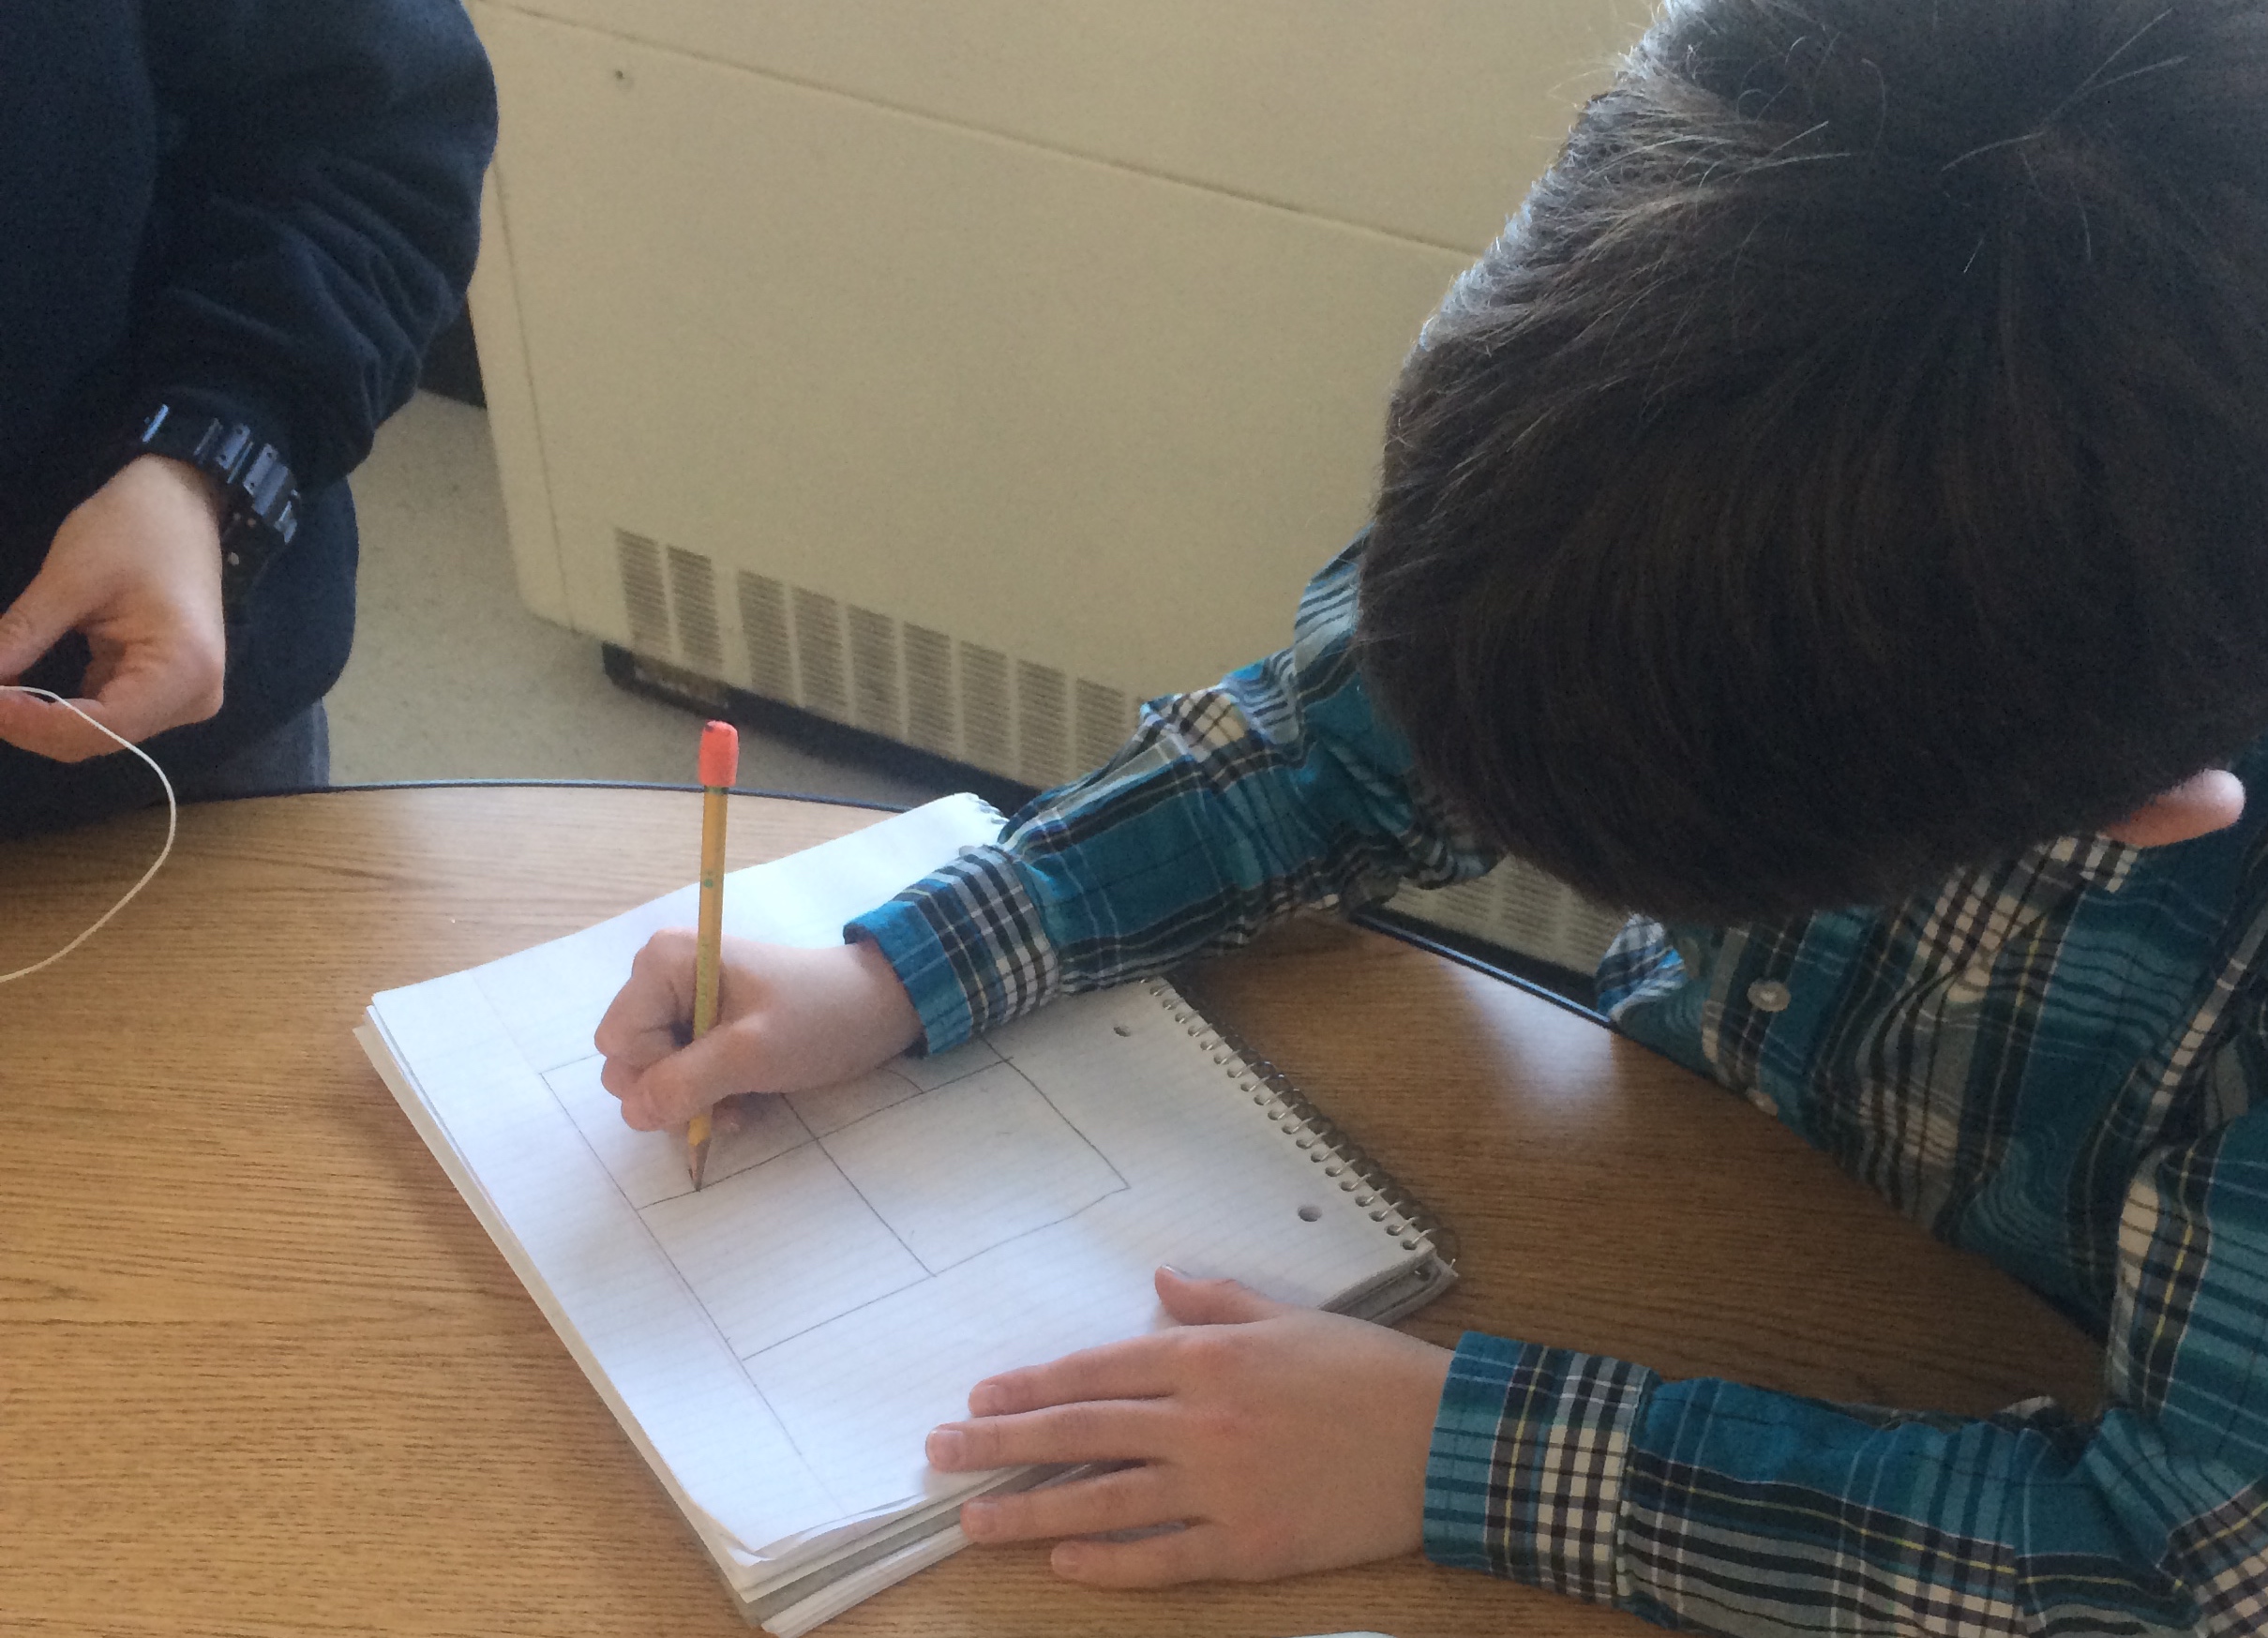
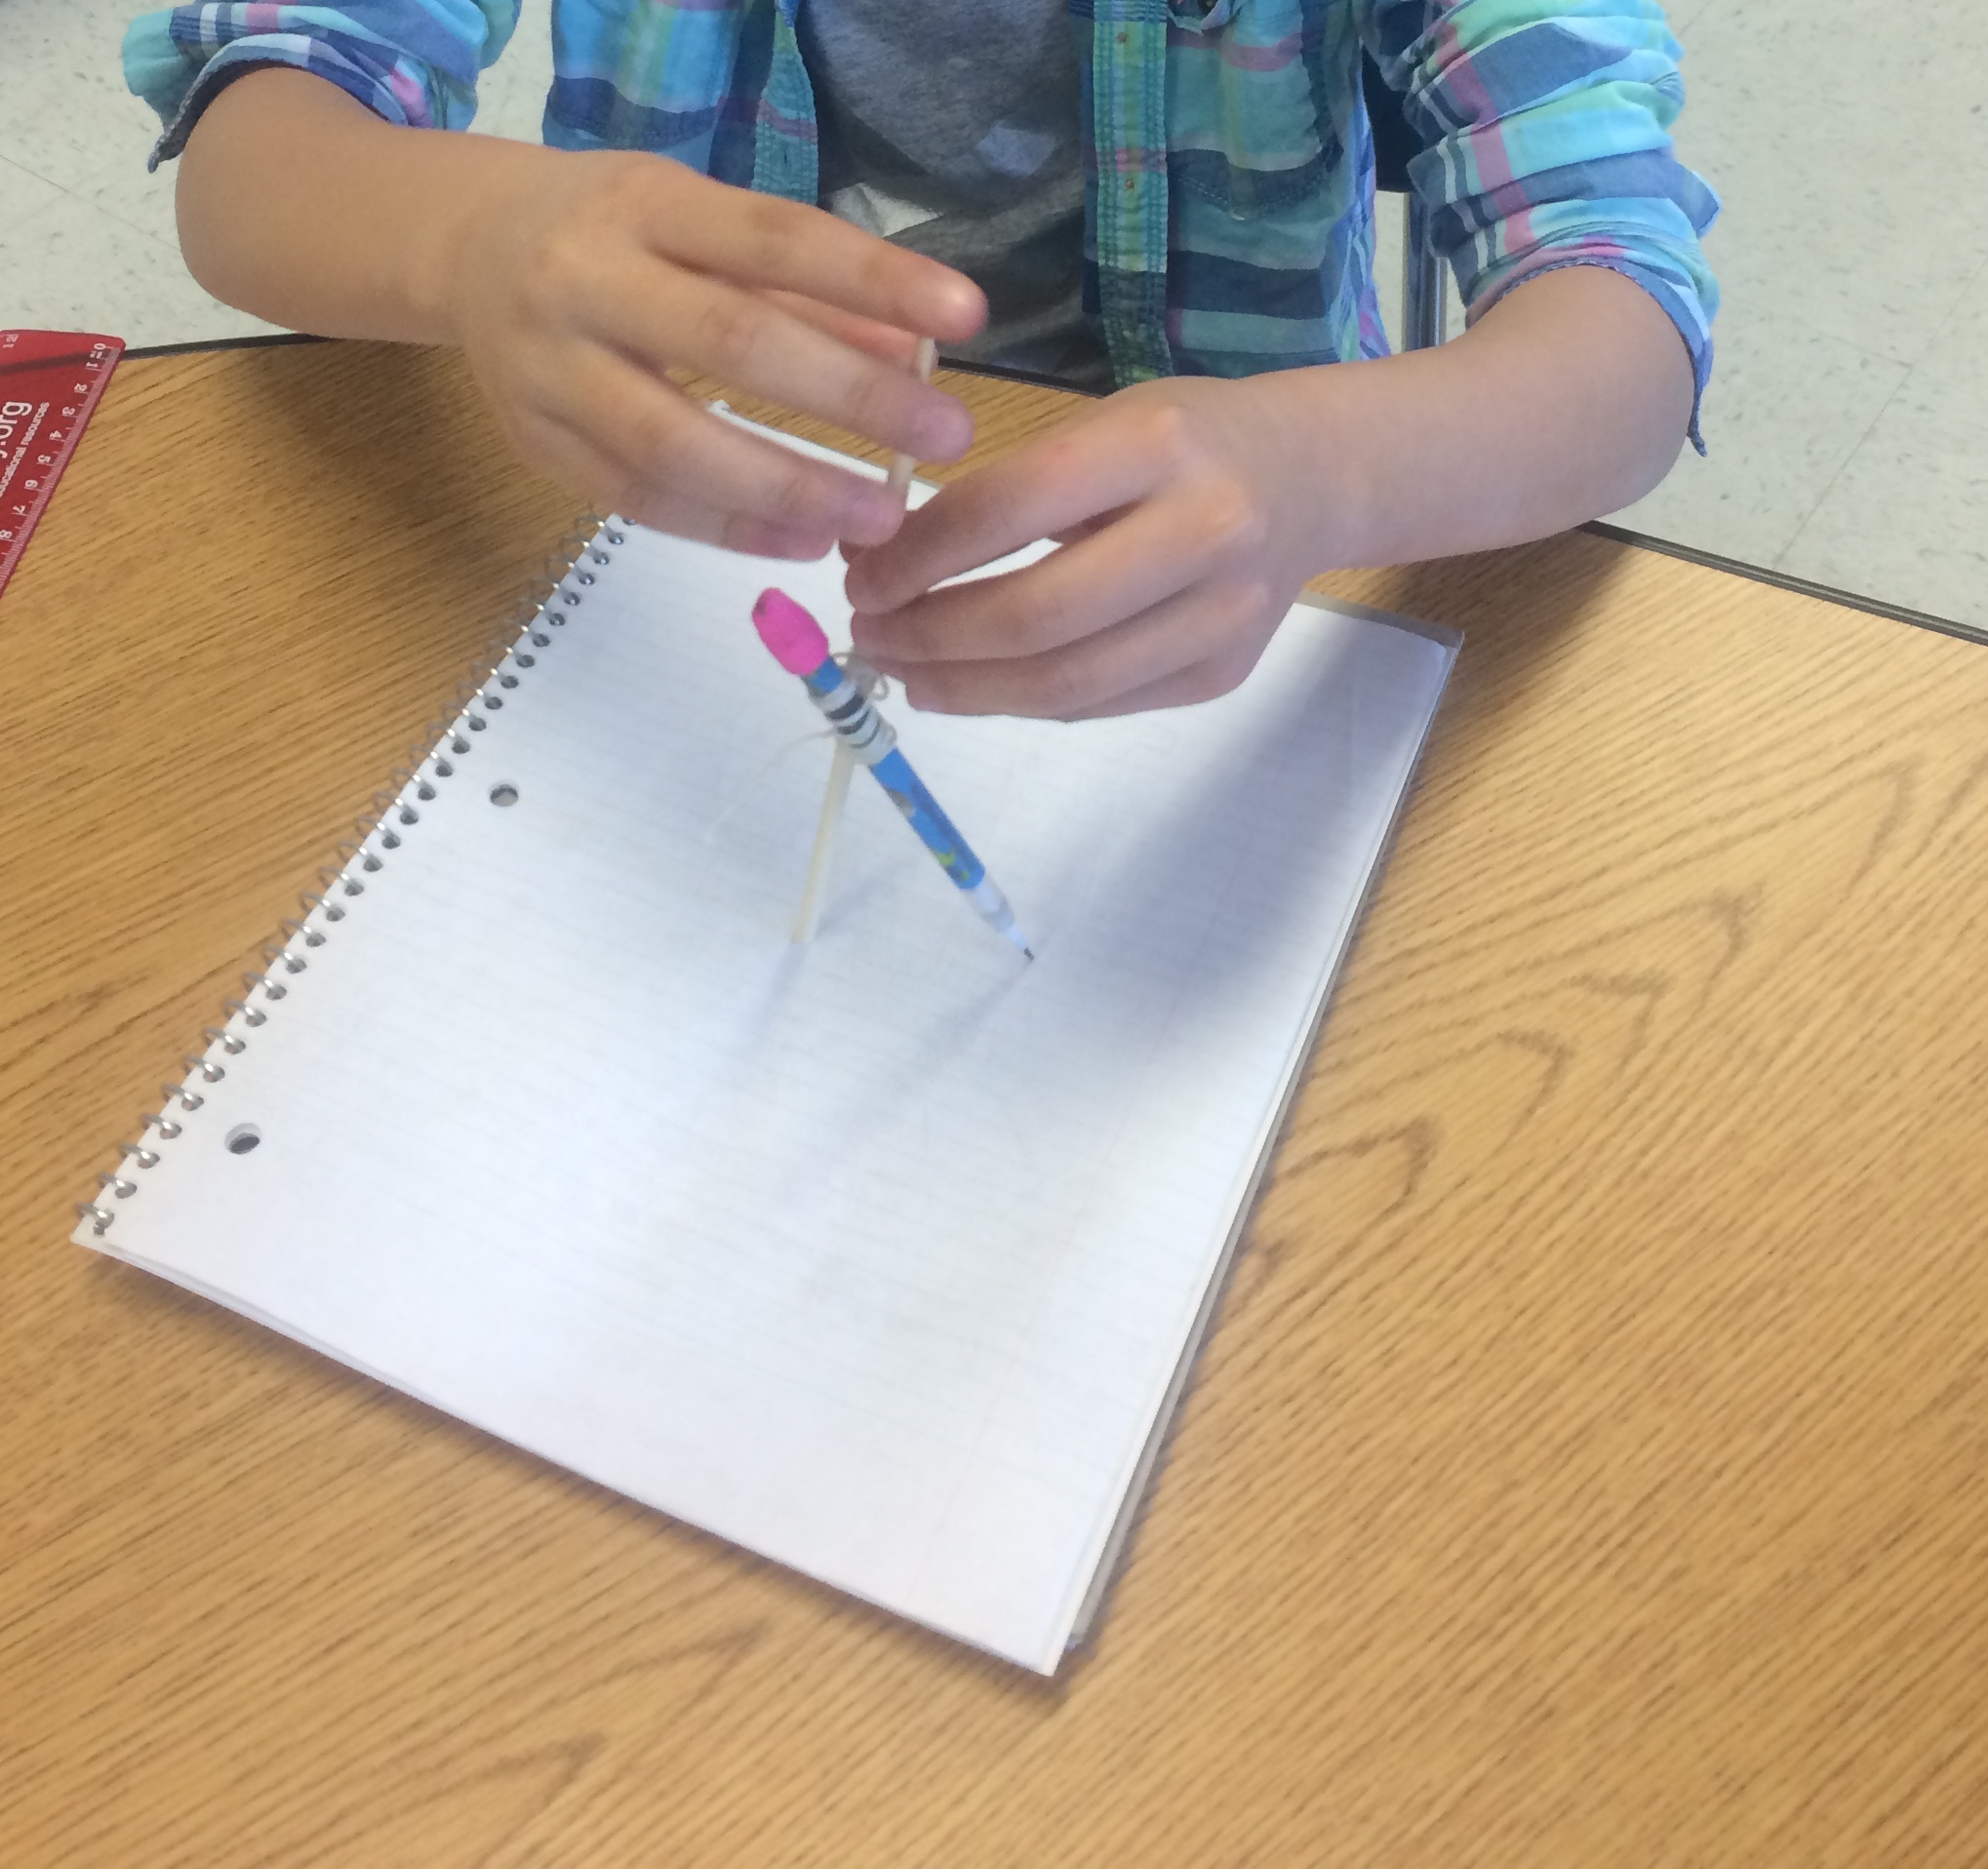
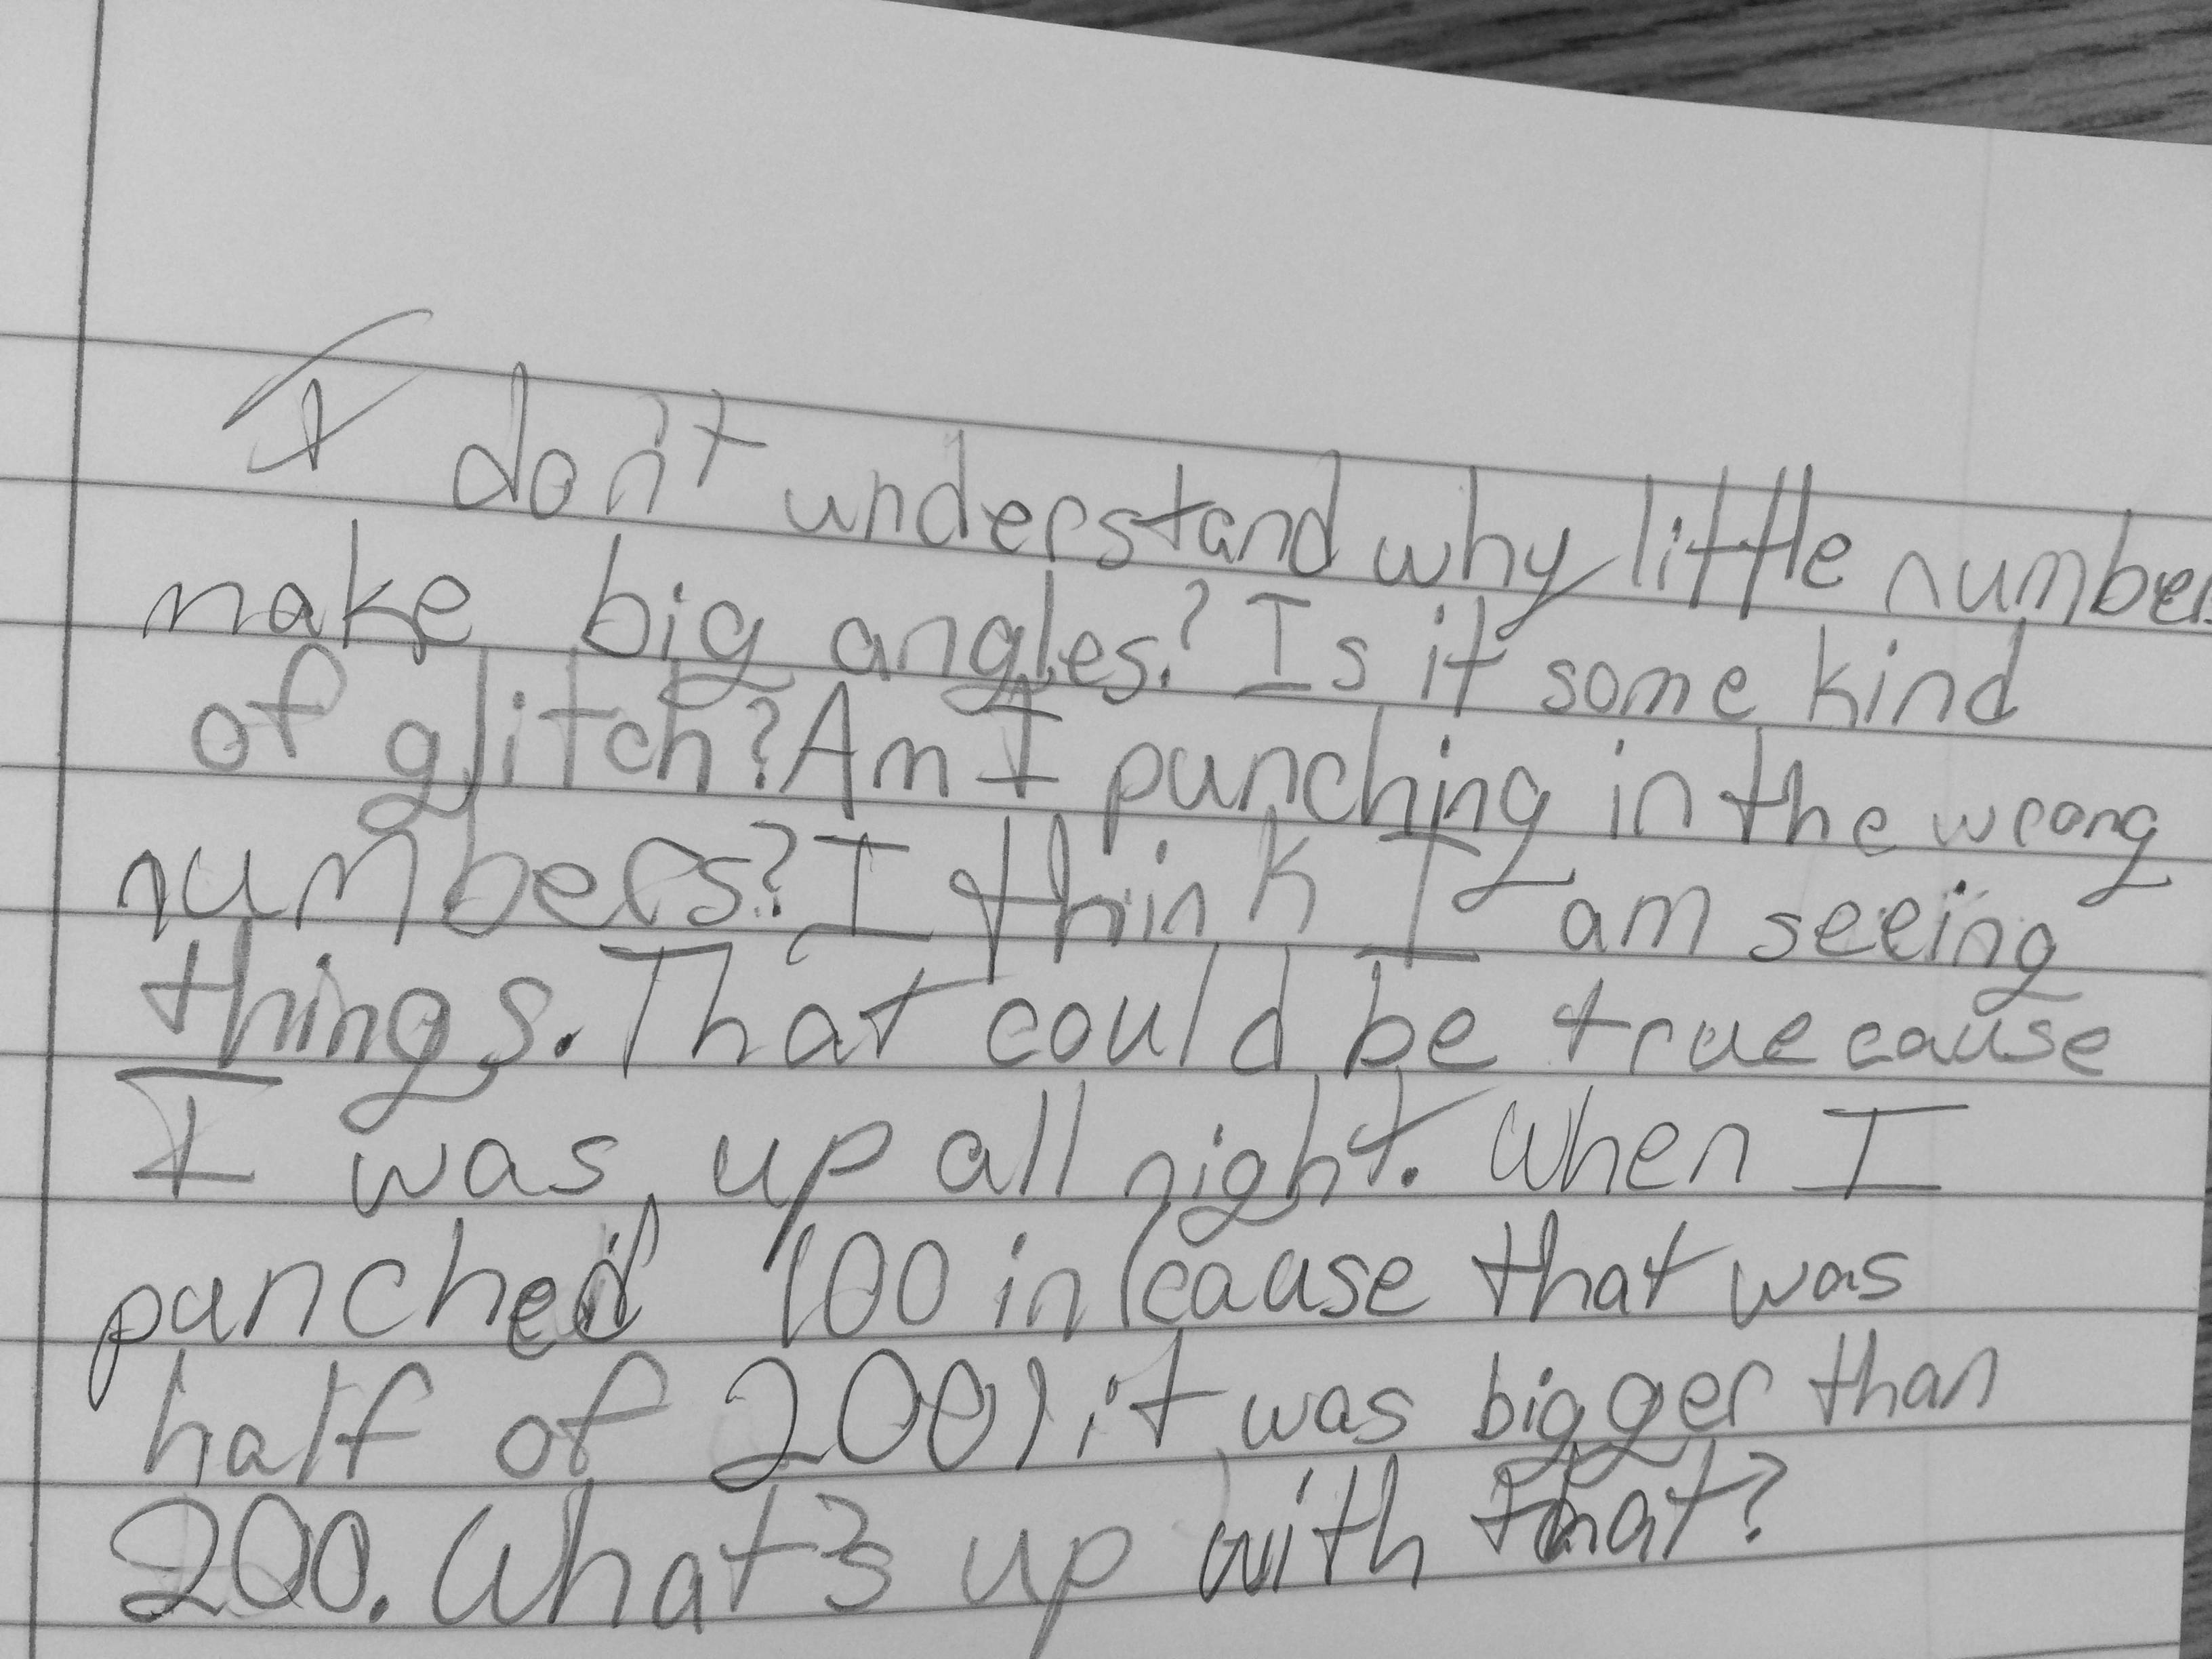
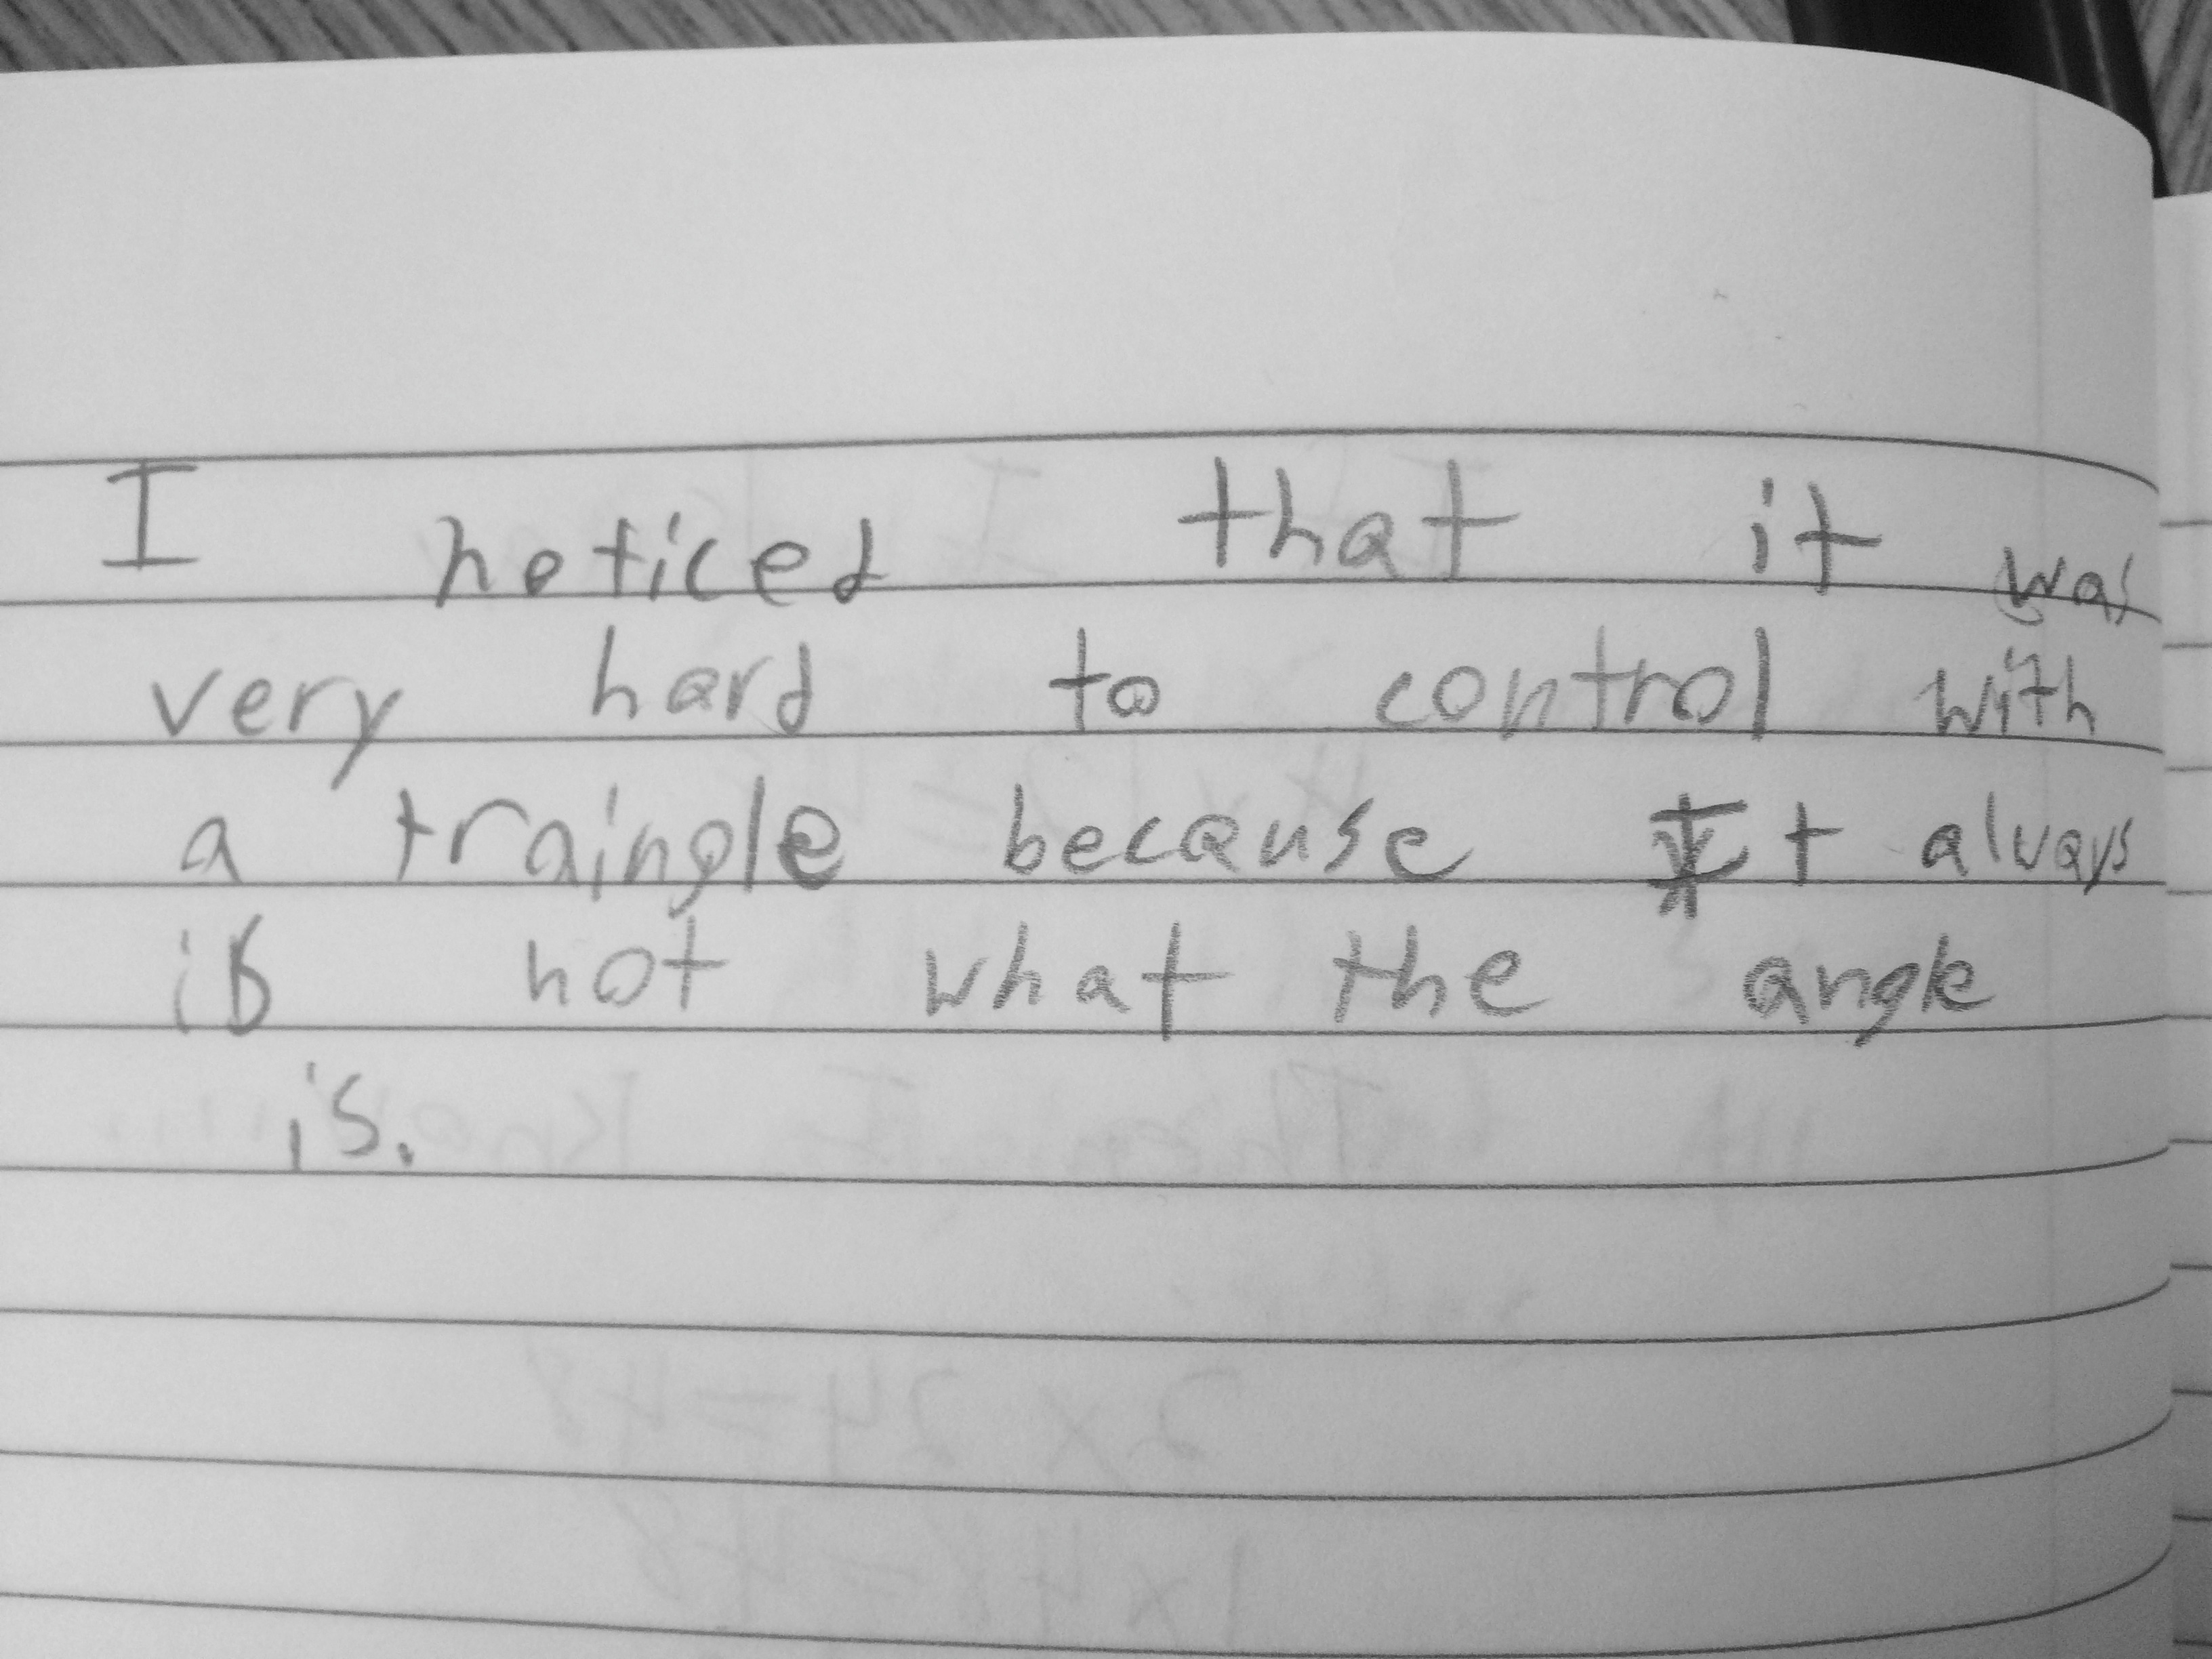
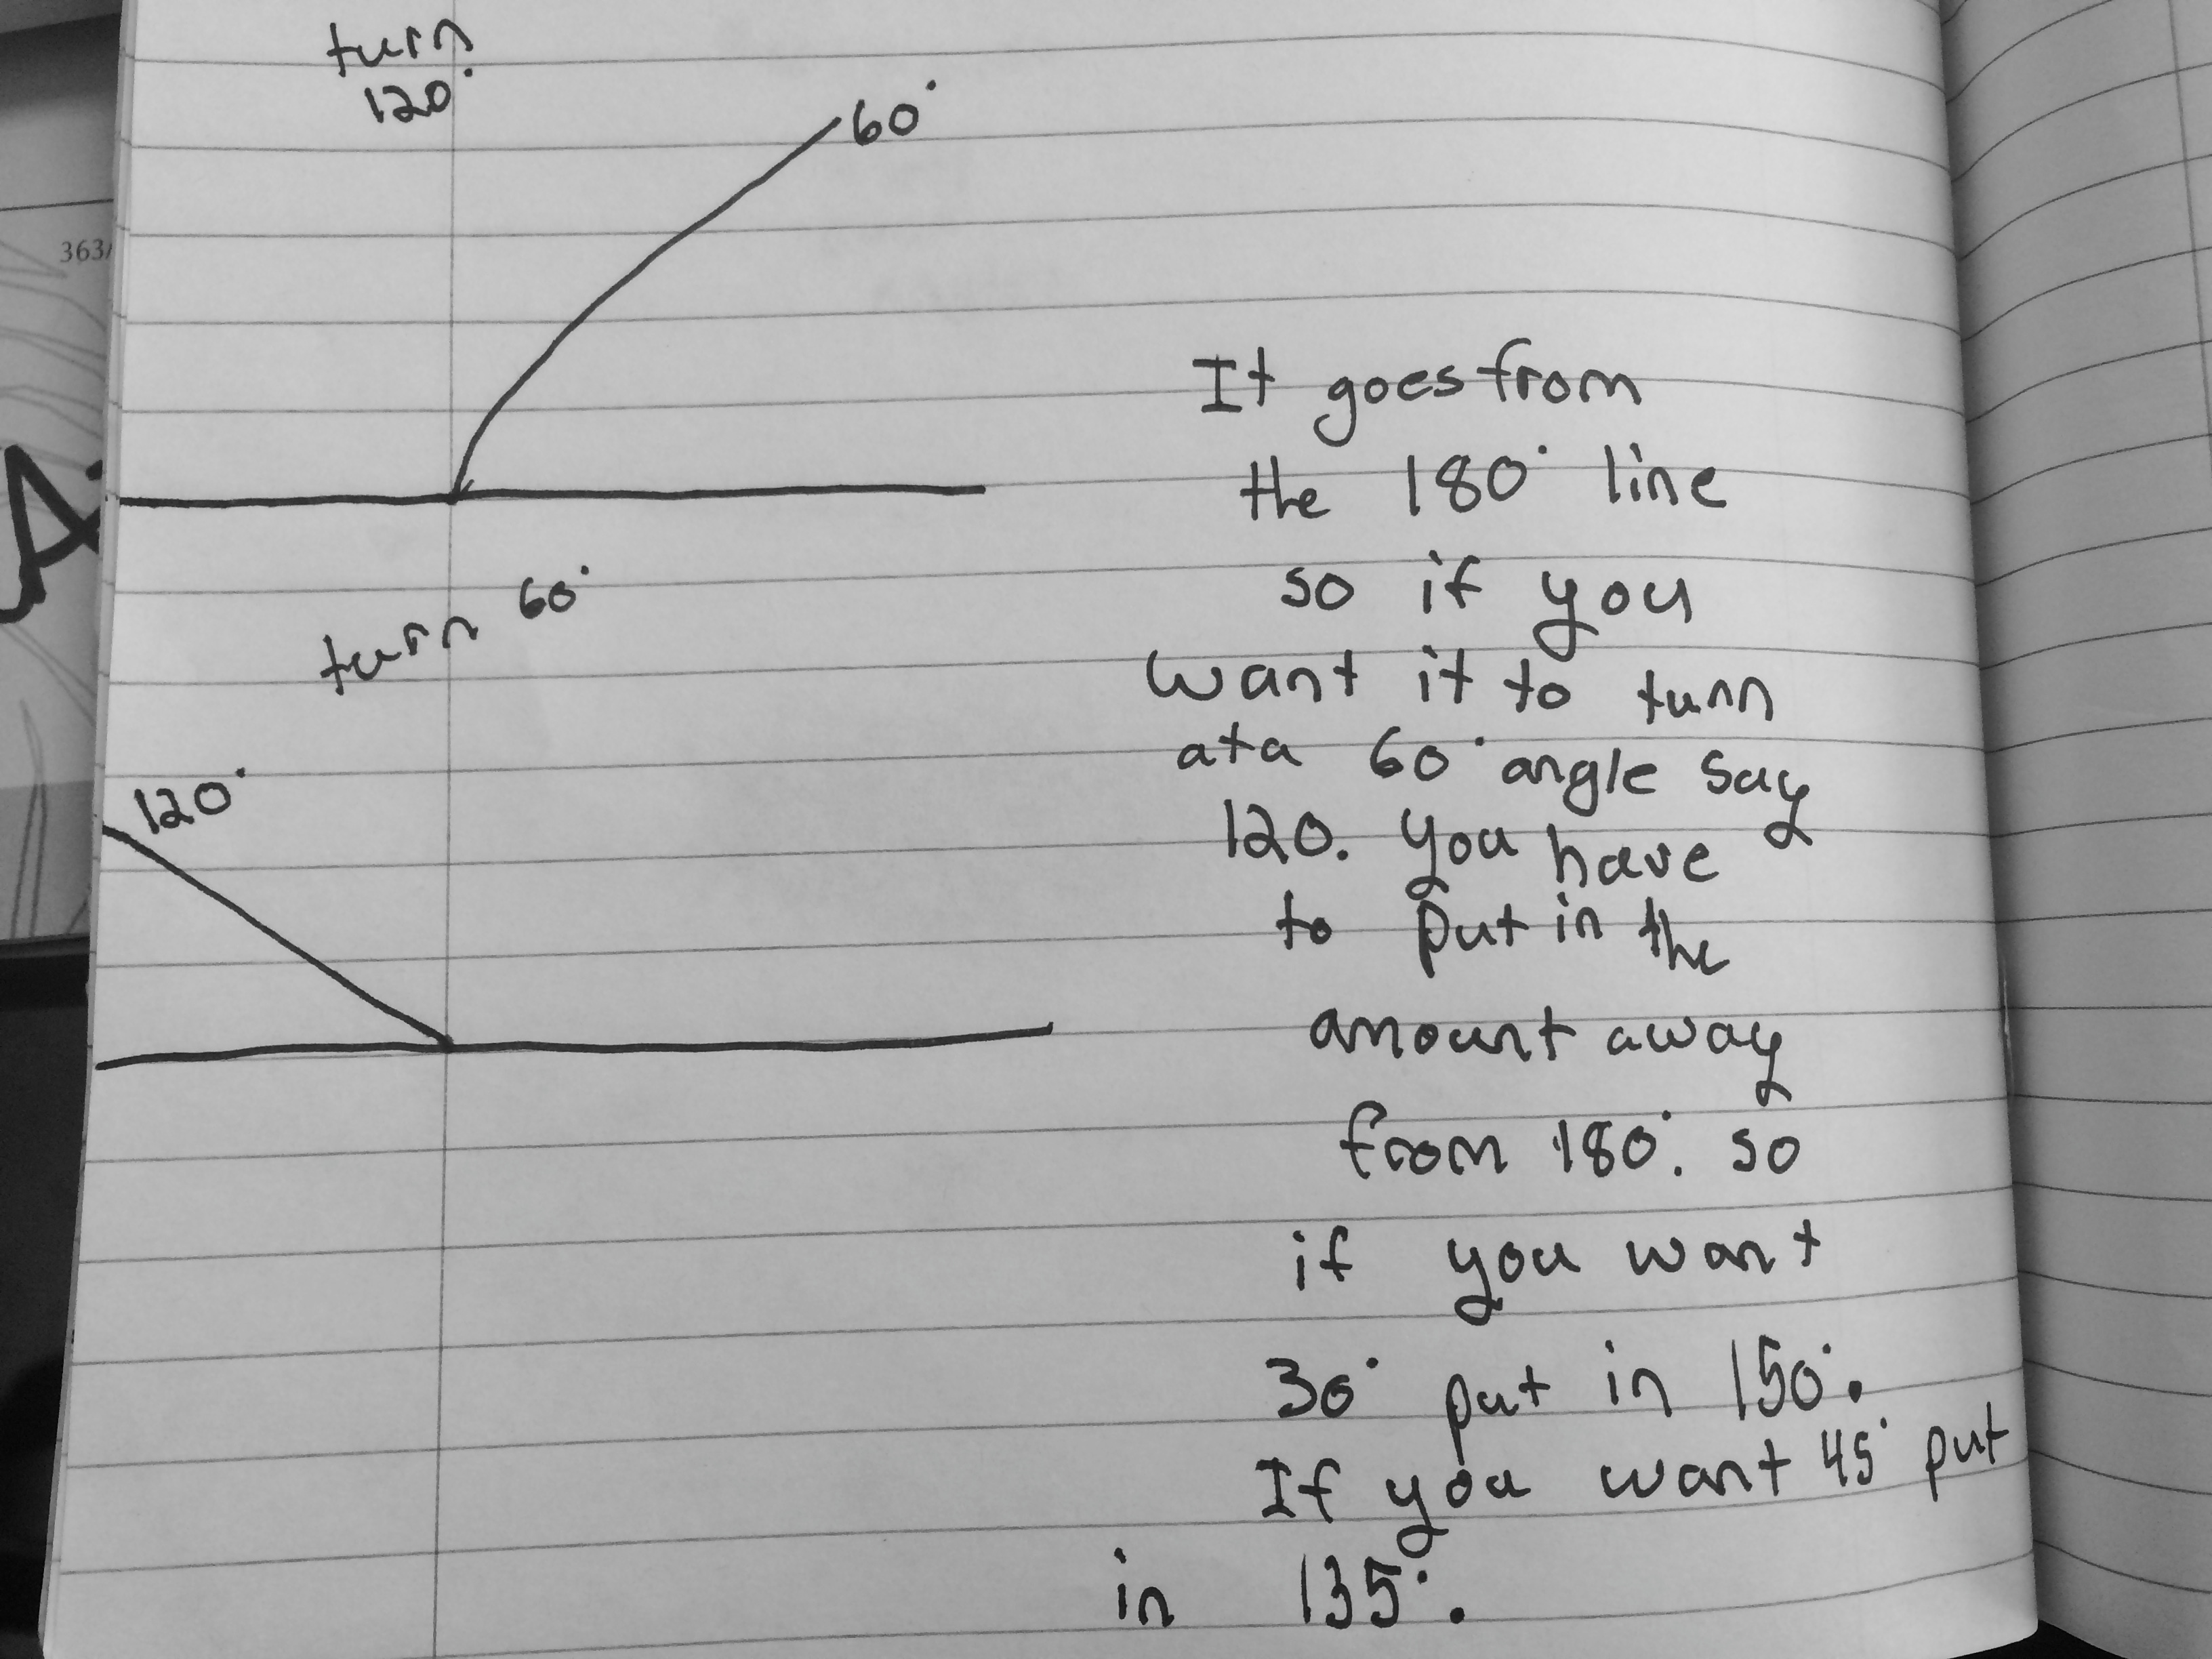
This standard in 5th grade always seemed like so much of a “telling lesson” for me.

Screen Shot 2017-01-24 at 6.12.12 PM.png

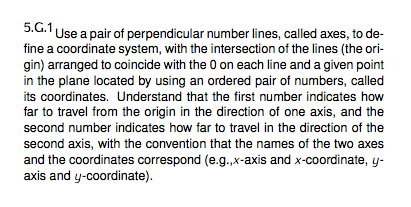
I never thought it was really addressed in the spirit of this standard in our curriculum, so I was typically like, “Here is what we call a coordinate grid. These are axes, x and y. We name the points like this…” and so on. It is not my usual approach so it always felt blah for me, for lack of a better word. I told them, they practiced plotting some points, and we played a little bit of Battleship (which was really fun).

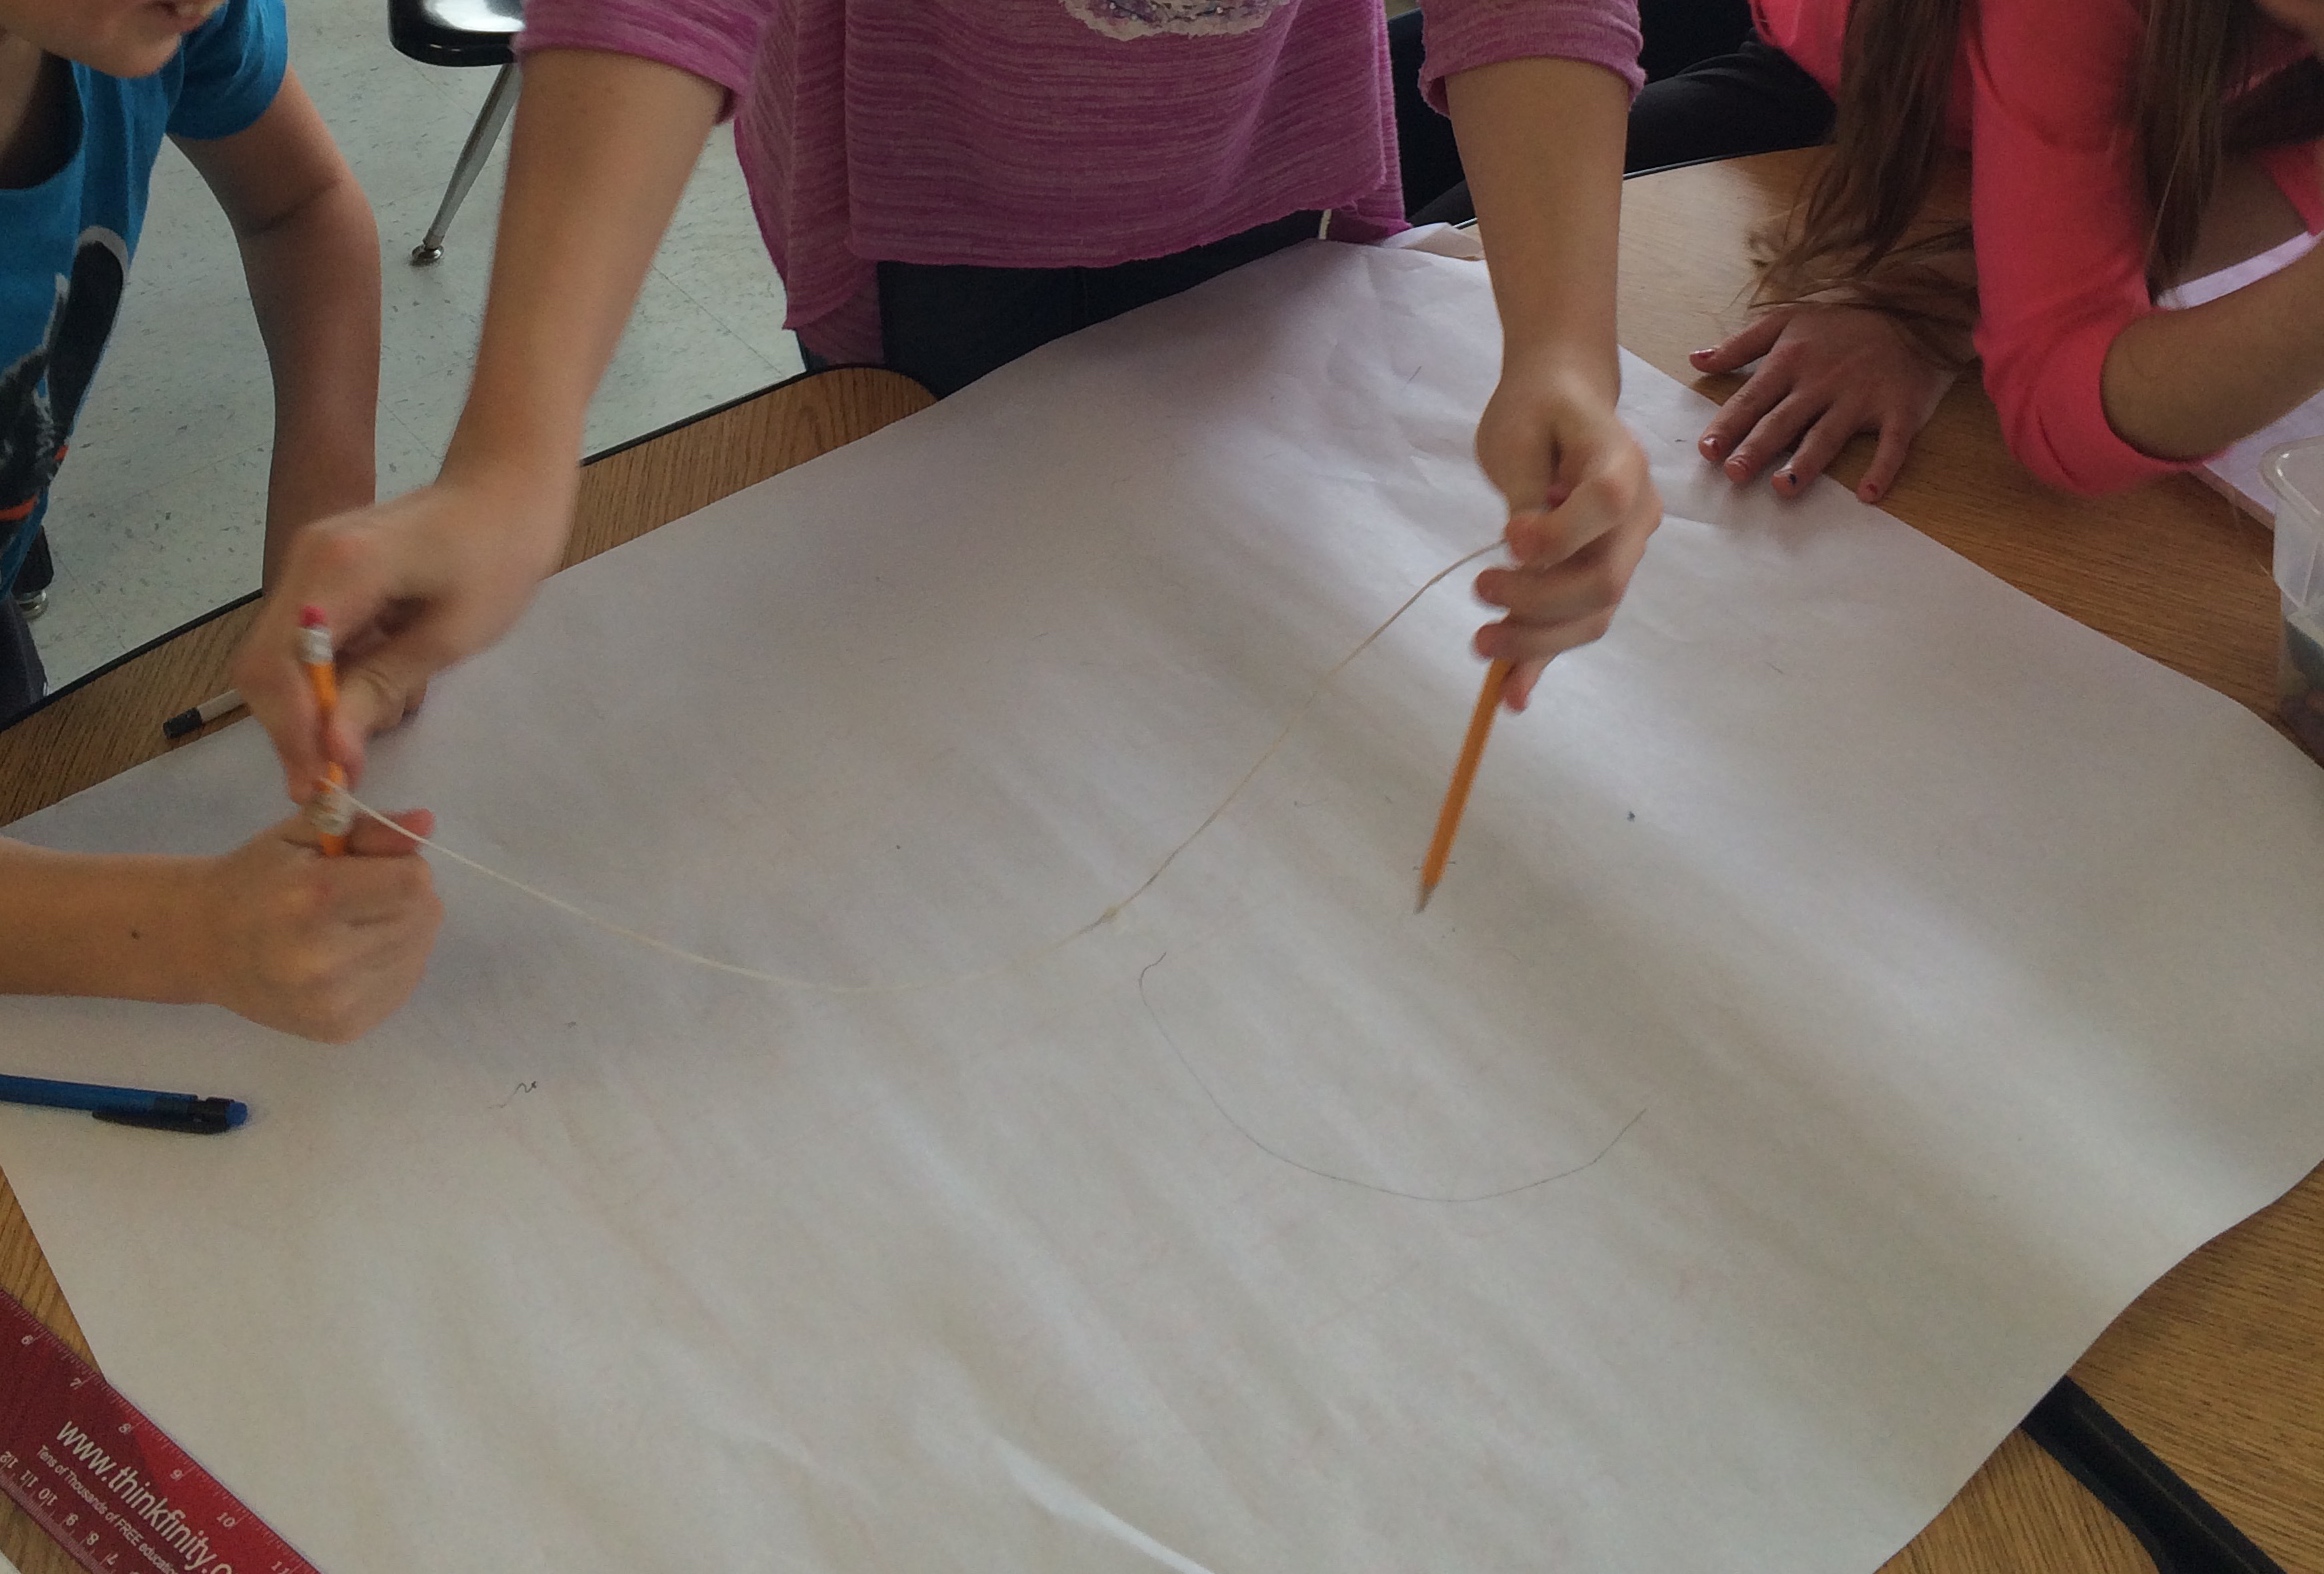
Last week, I was planning with Leigh, a 5th grade teacher, and we spent a lot of time just talking about what we appreciate about the grid and how we can develop a sense of need in the students for it. Since they are in the middle of their 2D Geometry unit, we thought this could be the perfect place to plot points that connect to form polygons and look at patterns in the ordered pairs.

The questions we wanted to students to reason about through our intro lesson was:

  • Why a coordinate grid?
  • Why name a point with an ordered pair? 
  • Why is this helpful?
  • What structure do we see?

So, we created this Desmos activity. This was our thinking on the slides and the pausing points we have planned for discussion:

Slide 1: It is really hard to describe a location without guides or landmarks.

Slide 2: Note how difficult it is. Pause and show class the results.

Slide 3: It gets easier. Still need some measurement tool. Notice the intersection of axes.

Slide 4: Note it is a bit easier this time. Pause and show class results.

Slide 5: Much easier because of the grid. Still need a starting point. See it is the distance from axes.

Slide 6: Now it is much easier. Pause show class results. Would love to show all three choices side-by-side (don’t know if this is possible in Desmos).

~Pause~ Ask, “What names of things on the grid would make it easier to talk about the point’s location?” Give students vocabulary and ask them to revisit Slide 6 to describe the location to a partner.

Slide 7: Practice writing some ordered pairs.

Slide 8: Practice writing some ordered pairs.

Slide 9: Start to see some structure in the four ordered pairs of a rectangle.

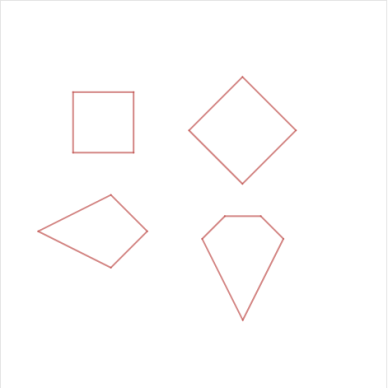
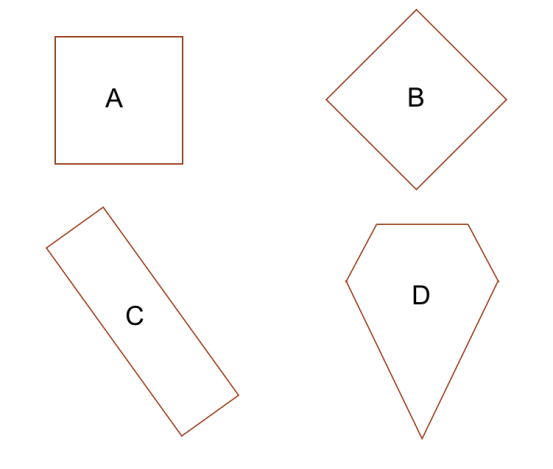
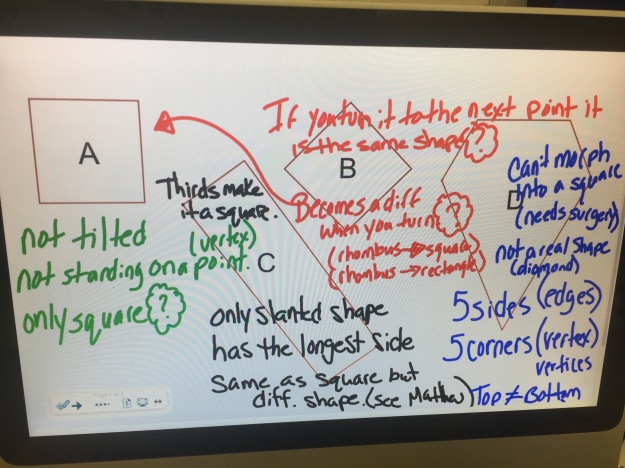
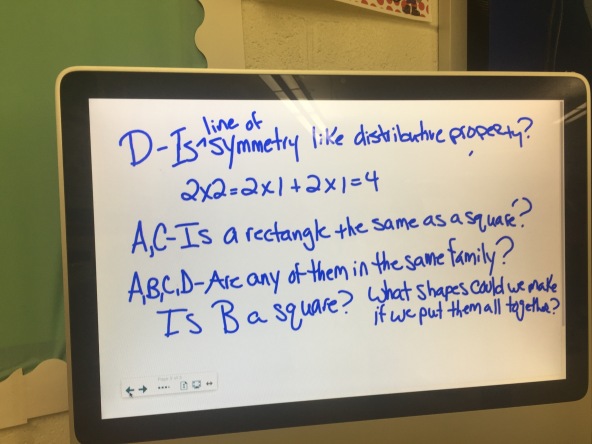
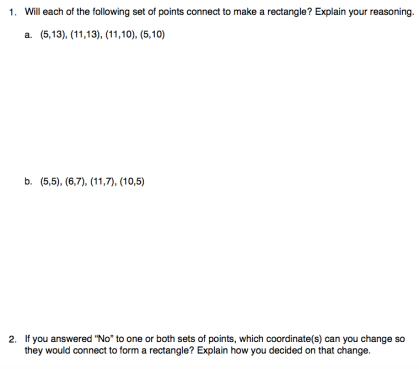
We are ending with this exit ticket (with grid paper if they choose to use it):

Screen Shot 2017-01-24 at 6.46.48 PM.png

While we are not sure this is the best way to intro the grid, we thought it would generate some interesting conversation. Since we are teaching it tomorrow, there isn’t much time for feedback for change, but we would love your thoughts.

Rhombus? Diamond? Square? Rectangle?

It happens every year, in what seems like every grade level…students continually call a rhombus a diamond. Last year, when we heard 3rd graders saying just this, Christopher helped the 3rd grade teachers and me put the students’ thinking to the test with a Which One Doesn’t Belong he created.

CayX_LdUUAEIQb5.png


This year, at the beginning of the geometry unit, we heard the diamond-naming again along with some conversation about a rectangle having to have 2 long sides and 2 short sides. What better way to draw out these ideas for students to talk more about them than another Which One Doesn’t Belong? We changed the kite to a rectangle this time, hoping we could hear how they talked about it’s properties a bit more.

Screen Shot 2017-01-05 at 6.30.31 PM.png

Overwhelmingly, the class agreed D did not belong because it had “5 sides and 5 corners” and eventually got around to calling it a diamond, which in their words was “not a real shape.”

While we knew a lot of things could arise, our purpose was diamond versus rhombus conversation, so of course the students had other plans and went straight to the square versus rhombus.We wouldn’t expect anything different!:) For every statement someone had about why the square or rhombus did not belong, there was a counter-statement (hence the question marks in the thought bubbles).

IMG_3730.jpg

Jenn, the teacher, and I were really surprised at how much orientation of A and B mattered to the name they gave the square and rhombus but did not matter for the rectangle. That was just a rectangle, although one student did wonder if a square was also a rectangle (he heard that from his older sister). The students had so many interesting thoughts that we actually had to start a page with things they were wondering to revisit later! That distributive property one blew me away a bit!:)

IMG_3731.jpg

We then sent them back to journal because we wanted to hear how they were categorizing a square and rhombus. It ended up being really interesting just seeing them try to explain why they were different and change their mind because they just started turning their journals around!

Some stuck with them being different..

img_3738


Some thought they were different, but one could become the other…


img_3744

Some were wavering but the square was obviously the “right way.”

img_3737-1

Some argued they were the same…

So much great stuff for them to talk about from here! I left wondering where to go from here? In thinking about the math, is it an orientation of shapes conversation? or Is it a properties conversation? In thinking about the activity structure, would you pair them up and have them continue the conversation? Would you throw the rectangle into this conversation? Would you have some playing with some pattern blocks to manipulate? Would you pull out the geoboards? I am still thinking on this and cannot wait to meet and plan with the 3rd grade team!

However, before I left school today, I went back to the 3rd grade standards to read them more closely:Screen Shot 2017-01-05 at 7.07.05 PM.png

and read the Geometry Learning Progressions, only to find this in 1st grade:

Screen Shot 2017-01-05 at 5.58.18 PM.png

Would love to hear any thoughts and ideas in the comments!


Rhombus vs Diamond

Every year in 5th grade, when we begin classifying quadrilaterals, students will continually call a rhombus a diamond. It never fails. While doing a Which One Doesn’t Belong in 3rd grade yesterday, the same thing happened, so Christopher’s tweet came at the most perfect time! (On Desmos here: https://t.co/rZQhu2SGnR)

Of course I had to pop into the same classroom today and try it out! The lower right was so obviously a diamond to me that I was curious to see if students saw the same thing and if it changed their reasoning about the rhombus as a diamond.

Here are pictures of the SMARTboard after our talk:

IMG_1784IMG_1783

After great discussions around number of sides, rotations, decomposition and orientation, they finally got to the naming piece. Honestly, I was surprised names didn’t come up as one of the first things. It started with a student saying the square didn’t belong because it is the only one that doesn’t look like a diamond. The next student said the lower left was the only one “that didn’t have a name.” When I asked him to explain further, he named the square, rhombus, and diamond. Because I knew at the end of our talk I wanted to ask about the diamond vs rhombus, I wrote the names on the shapes. Another classmate added on and said the lower left “may not have a name but it is kite-shaped and looks like it got stuck in a tree sideways.” I asked the class what they thought about the names we had on the board and it was a unanimous agreement on all of them. Funny how quickly they abandoned their idea from yesterday, so I reminded them….they were not getting off the hook that easy;)

“Yesterday you were calling this rhombus a diamond, what changed your mind?”

Students explained that the lower right actually looks like a real diamond and the rhombus doesn’t now that they see them together.

“Can we call both of them a diamond?” I asked. I saw a few thinking that may be a great idea. I had them turn and talk to a neighbor while I listened to them.

We came back and they seemed to agree we couldn’t call them both a diamond because of the number of sides. They were really confident in making the rule that the quadrilateral one had to be a rhombus and the pentagon was the diamond. I pointed to the kite and asked about that one, since it has four sides. “Could we call this a rhombus?” They said no because the sides weren’t equal, so not a rhombus. And because it didn’t have five sides, not a diamond either.

Thank you Christopher! All of these years of trying to settle that rhombus vs diamond debate settled right here with great conversation all around!

Next up, this one from Christopher…


Perimeter in 3rd Grade

I am in the unique position over the next few weeks to see perimeter and area work in 3rd, 4th and 5th grade. It is so incredible to see the overlap across all three grade levels and, being a 5th grade teacher for so long, it is great for me to see where this work begins.

After planning with Hope and her student teacher, Lori, last week, we taught the lesson introducing perimeter today. On Friday, the students measured things around the room in different units of measure, having discussions about most appropriate units. For example, when measuring the length of the room would we use the same unit as we would for the width of our pencil eraser? Why?

Since I was not there for the lesson on Friday, I was super curious to just hear what students thought about when they heard the word “measuring.” I wrote the word on the board and away we went. They were very quick with benchmarks, equivalents and different dimensions we can measure. I did a terrible job with my picture, but I got a couple really interesting questions like, “Can we measure anything? Air?” and “Can we measure the corner angles of things like the carpet?” Also, after a student had shared that one yard is the same as your hip to your ankle, students questioned if that was true because of the different heights of people. All of these things are great for students to explore at later times!

IMG_1518

Hope introduced the Investigations problem of an ant traveling around the edge of a piece of paper. To be honest, we were not thrilled with the context, but at the time we could not come up with anything snappy or original, so we went with it. We thought it was nice because, in inches, we could see if students measured to the half inch and also how they worked with the half inch when combining to find the perimeter. In hindsight, I am thinking a city map might have worked, however then the scale comes into play, so maybe not?? We let them choose the unit they thought would be appropriate, put them with a partner and they went off to work together. We were surprised to see most students using inches and when asked, thought that it would be “too many centimeters.” They seemed to chose units based on the biggest unit that still fits the object, but not thinking about precision and getting the smallest unit for that.

This is where I am continually amazed by what students know and intuitively do with mathematics.


It was interesting to see some pairs not know how to deal with the half,”not quite 9,” but know they only had to measure one side and then put “11” on the opposite side.

IMG_1520

While another group had the 8 and one half written exactly like they said it “8 and 1 (one).5(half) inches.” Although written incorrectly, they dealt with it beautifully in their computation. However, I would want to bring up the equal sign in future share outs so they 8×2=16+1=17 would be written correctly. Does anyone use arrows in the elementary grades for this? 8×2–>16+1–>17? Or is it more appropriate for separate lines at this age?

IMG_1525

When I walked up to this group I asked where the ant was walking because of their lines through the middle of the paper. They said around the outside but it is the same no matter where you draw the line. I asked them to show me the 8 inches and I left them to talk about the 1/2 inch.

FullSizeRender 42

Some students did not deal with the 1/2 inch but seeing the ways they found the perimeter and wrote their equations, I was able to see the formula for perimeter coming to life.

IMG_1527 FullSizeRender 44

As students got finished with their first unit choice, we had them find the perimeter in another unit. It was nice to see the multiplication from their previous unit showing up a lot. IMG_1526

When I saw this one, I didn’t really know what to do with it. What do you with a 3rd grader using .5 as half? I asked them what .5 meant and they quickly said one half. They said one can be broken into .5 and .5 just like it can be broken into 1/2 and 1/2. That is so interesting to me and I would have loved to explore that conversation more, but with a whole class that is not ready to go there, I wrote it on the board and moved on.

FullSizeRender 43

As always, there is not enough time in a class period for me to talk about math with the kiddos. Tomorrow morning, students will journal about their strategy to find the distance the ant traveled. Since the majority of the class only measured two sides, we want to make explicit, through student sharing, why they didn’t have to measure all four sides in this case.

They next part of the lesson, which Hope and Lori will continue tomorrow, includes the students creating their own ant path on grid paper and finding the perimeter of that path. We are not going to dictate that the path must be a rectangle, but the ant must stay on the grid lines. We are hoping that this generates the conversation of when we can double the two sides and add them and when we can’t, assuming students draw irregular shape paths.

#PiDay2015…Circle Fun

Some of my students this year were excited to “celebrate” pi day and were very disappointed that it fell on a Saturday, so we decided to have some pi fun on Pi Day Eve. I am not one for “gimmicky” holiday lessons and wanted whatever I decided to do, to not just be definitions of circles and their properties or a formula for how to use pi to find measurements, but instead an activity that allowed students to discover all of the cool things about circles and patterns that arise from that work.

After brainstorming with a colleague, she suggested I just have the students try to create a prefect circle. Loved it. I put out tape, scissors, rulers, paper, string and told them if they thought of other tools they wanted to use, they had to pass my approval first (I wanted to keep the protractors and compasses out of the equation for right now). Off they went! It was soooo interesting to see all of the great approaches and all of the cool ideas that emerged from their work.

I found it so interesting that quite a few first drew a square and tried to find the center. They said they knew that the circle could be made inside of it because a circle is 360 degrees and each angle of the crossed lines was 90. The problem became figuring out how to get the “rounded edges to be the same.”

IMG_9519_2 IMG_9520_2

Quite a few groups had seen a compass before (but didn’t know what it was called) and tried to recreate one with the available tools. Some started from finding a center and going from there, while others created the center by just placing the scissors on the paper and going around from there. After many attempts, they were starting to realize how important keeping that constant distance in the scissor opening really was.

IMG_9528_2 IMG_9532_2

To solve the constant distance problem, one group used tape to keep it the same while another group used string (and chopsticks she just happened to have in her lunchbox that day:).

IMG_9582_2IMG_9517_2

This group solved the constant distance with two pencils attached with string. The funniest part of this one were the trials as the string kept wrapping around the center pencil as they went around and never meeting exactly back at the start. They eventually figured it out after blaming the “center holder” numerous time for “moving the pencil.” Another group kept a constant distance by taping their string to the center of their paper and putting a pencil on the other end.

IMG_9573_2IMG_9584_2

This group created a center from overlapping rulers and attempted to put string around the the ruler corners to make an arc, but couldn’t agree with how to get them all the same. While another group tried to use the ruler ends as the center but ran into the same problem with the rounded edges.

IMG_9570_2IMG_9574_2

This idea was interesting to watch evolve. She had seen the group on the floor (in the pic above) and said she realized that any rectangle rotated would make a circle. She then grabbed a ruler, taped two cap erasers to each end and thought the caps would leave eraser marks she could go back and trace after rotating the ruler. That didn’t work, no marks. She then cut her pencil to get some lead and taped that to one end.

IMG_9580_2 IMG_9581_2

The final product…..IMG_9586_2 After sharing their circles and approaches, I had the students jot down some things that were important when constructing their circles.

IMG_9588 IMG_9589 IMG_9565_2 IMG_9569_2IMG_9590

From these, I realized (and was surprised) the students have some circle vocabulary in their toolbox. I decided to get that out so we could be sure everyone in the class had exposure to all of this great stuff. I asked them to share their findings and what measurements they used or could find in their circle.

IMG_9535_2One group had finished their circle early, so I asked them to find some of these measurements. They found the diameter and circumference with the ruler and string they had used in the construction. It was so interesting to see the intuition students have around finding the diameter. They knew it had to go through the center and that no matter where they measured from, it would be the same. It makes me wonder why we, as teachers, sometimes think that we need to give students definitions for things before they get to demonstrate their intuition around these very ideas. I could have told them “diameter is distance across the circle through the center” before the lesson started, but they already knew that, love it.

After testing a few circles, this group started to see pi emerge…

IMG_9563_2 IMG_9564_2 IMG_9562_2For the the last circle in this list, they measured the diameter of their large circle they created and I asked them to estimate the circumference. After seeing that each circumference was “about 3 times as much,” they estimated 46 x 3 to be circumference. They haven’t had a chance to test it on the actual circle yet because we ran out of time, but that will be some fun on Monday!

Happy Pi Day 2015!

-Kristin

Geometry Is Worth The Extra Time…

As I am sure many teachers can attest, there is a constant struggle each year between covering content and the precious amount of time we have to engage the students in learning. Prior to the past two years in the classroom, this guilt always seemed to creep up most during our geometry units. I used to feel that once the students could find area, perimeter, and volume, we would move back into our fraction and decimal work because that always took SO much time to develop a deep, foundational understanding. While geometric representations such as an area model support the fraction and decimal work, it is still not the 2D or 3D unit work.  Right or wrong, I felt I had to prioritize to make use of the little time I had for the best of my students. Over the past two years, however, my geometry units have been taking longer and longer because I have started to see things evolve in my geometry units that has me  wanting to kick myself and go back in time to give my past students a different learning experience. From the connections to number and operations to the development of proofs and generalizations have been eye-opening.

As all of these math connections were going through my head, I see this tweet from Malke (@mathinyourfeet)…

mrahhh, it felt like validation in some weird way.

After this Twitter conversation, I started to dig back into my students work to find examples that makes these connections visible.

After doing a dot image as our Number Talk one day, I asked students to see if they saw any connections between the image and our volume work that day. This work shows how students see the commutative property in both, multiplication as groups (like layers in volume) and most importantly puts a visual to how multiplication and its properties “look” in both 2D and 3D.

IMG_7754IMG_7755IMG_7763IMG_7765IMG_7764Then volume led into some great generalizations about how multiplication “works” through looking at patterns, which is extremely important in mathematics in and of itself.  In keeping constant volume (product), students realized they could double one dimension (factor) and half the other. In doubling the volume (product), the students realized they double one dimension (factor) and leave the others the same. T

IMG_7795_2IMG_7797This volume discoveries later let to this claim on our claim wall:

IMG_8148The students extended this area and volume work to fractions/decimals that showed that fractions/decimals act as numbers in operations as well, supporting the structure of our number system.

IMG_7632IMG_7980While we classified polygons, I saw my students develop proofs for angle measures and our always, sometimes, never experience was invaluable. This work in connecting reasonings through visuals of the polygons explicitly supports the Mathematical Practices of using models, perseverance, and repeated reasoning.

IMG_8280_2IMG_8283_2IMG_8423Then our work with perimeter and area solidified the importance of students creating a visual in building number is so important. In a problem with equal perimeter and different area (moving into greatest area), students created a beautiful visual for the commutative property as well as supported students in seeing the closer two numbers (with the same sum), the greater the product.

IMG_8854IMG_8866IMG_8867-Kristin


Pre/Post Assessment Reflection

We started our 2D Geometry unit with Talking Points: https://mathmindsblog.wordpress.com/2014/11/13/talking-points-2d-geometry/.  This was the ultimate pre-assessment in which I could hear what the students were thinking around mathematical concepts while at the same time, they had a chance to also hear the thinking of their peers. After the talking points activity, I had the students reflect on a point they were still unsure in their thinking.

We are now wrapping up our Polygon unit, and I thought it would be interesting for them to reflect back on what they were unsure about in the beginning, and get their thoughts now. I have a class full of amazing writings, but here are just two of the great reflections (the top notebook in each picture is the pre-unit and the bottom is post-unit)….

Photo Jan 15, 11 42 12 AM Photo Jan 15, 11 55 54 AM

Looking at the class as a whole, it was so interesting to see their math language develop and see them laughing at things they had written before. I loved that the student above wrote, “I am smarter!!!” How amazing they can see their own learning!  During their reflection time, it was so fun to also hear students exclaiming, “See, I KNEW I was right!”

This is the first pre/post assessment I have ever done where I think the students enjoyed it as much as I did! They were as proud of themselves as I was of them!

-Kristin

Developing Claims – Rectangles With Equal Perimeters

Yesterday’s math lesson launched based on this student activity book page in Investigations…

IMG_8861

Students read the introduction and I first asked them, “If we were to build these in Minecraft, was feet an appropriate unit of measure?”  Some thought that feet seemed too small for a garden and instead wanted to use yards, that was, until one student schooled us all on Minecraft. Come to find out, Minecraft uses the metric system with each block representing one cubic meter. We then changed the unit to meters and were on our way.

I gave them 10 minutes, either with a partner or individually, to build as many different rectangular garden designs as they could with 30 meters of fencing. As I walked around, it was interesting to see how students were designing their gardens. Some started building random dimensions and adding/subtracting fence links to eventually hit 30 while others had thought of one rectangle to start and adjusted from there by subtracting/adding from sides. It was fun to see the ones that discovered a pattern in their building and sped through the rest of the rectangles. Some beautiful patterns emerged….

IMG_8854Photo Jan 14, 1 23 24 PM

Photo Jan 14, 1 22 35 PMAfter 10 minutes, I asked them fill in the table on their activity page and chat with their table to see if anyone had any dimensions they didn’t have. As a table, they came up with some noticings based on their table, Minecraft builds, and process of building.

IMG_8862 IMG_8863 IMG_8865 IMG_8866 IMG_8867 IMG_8868 IMG_8869 IMG_8870 IMG_8871 IMG_8872 IMG_8873The class ended after this group work. Talking with another colleague about the lesson at the end of the day, we chatted about what claims could come out of this lesson. It was so interesting to me to think about not only the geometric claims, in terms of rectangles and dimensions, but also the numeric claims that can evolve from these conversations as well. And to think that these number claims are grounded in a visual connection is pretty awesome to me!

I was so I started today by pairing up every two tables to share with one another. One table read their noticings while the job of the other table was to ask clarifying questions. That gave me time to circulate, listen, and choose the claims for our class share out. After the table shares, we reconvened as a whole class and chatted about a few of the claims as a group.

IMG_8853I asked them to think about similarities and if we could combine some of them to form one claim based on our work.

Class ended with a journal entry in which they worked independently to begin to form a claim or the beginnings of one. Here is where I will start tomorrow…

IMG_8855 IMG_8856 IMG_8857 IMG_8858 IMG_8859 How fun!

As a follow up on this post, this is the assessment on their work with perimeter and area. During the class period, only one student started working on finding the square that would give them the largest area with a perimeter of 30. After this idea came out in our class discussion, using fractional dimensions was something that others were thinking about during the assessment.  Here is a student’s (different than the initial student) work that I thought was pretty fantastic:

Photo Jan 16, 11 51 34 AM

-Kristin


Area/Perimeter – My homework over vacation

It is always fun when I can look back at my past blog posts, see what I learned from a lesson, and reflect on student reasonings before I teach that same lesson again. This past week we were working on this lesson from last year: https://mathmindsblog.wordpress.com/2014/01/27/area-and-perimeter-of-squares-student-noticings/.

The lesson unfolded in much the same way, with the class patterns looking like this:

IMG_8589_2

I anticipated all of them, however, like last year, there always has to be one that throws me a curve ball and leaves me math homework over Christmas vacation:)

The 5th statement looked like this in his math journal:

IMG_8587_2

With these other noticings below it…

IMG_8588_2

His explanation focused on the pattern of the fraction the perimeter is of the area. The numerator stayed a two and the denominator went up by one on every even dimension. I honestly didn’t know what to ask him because the question “Why is that happening?” seemed way to broad. He played around with building the squares and was not getting anywhere. I am thinking, after chatting with Christopher (@trianglemancsd) on Twitter, that focusing on the meaning of the fraction first may be the way to go??

Basically, I first have to sit down and reason about his on my own…gotta love math homework on vacation!

Finding Angle Measures

In our 2-D geometry unit, we have been classifying polygons based on attributes of sides and angles.  This week, the students were using what they know about angle measures and polygons to find the measures of other angles.  These are the polygons students were working with:

0001

The first day, I put polygon F on the whiteboard and asked tables to develop a proof for the angles in F. I was excited to see they had worked with this in 4th grade and were comfortable in being able to prove it was 90, 45, 45. Here are a couple of the proofs from that day’s work…

IMG_8423 IMG_8422IMG_8417IMG_8457

It was interesting to my colleague and I to really think deeply about what the students were saying in their explanation. We had to ask ourselves if they were really thinking about the angle itself when they were saying “A triangle is 180º because it is half of a square which is 360º.” Their proof with the polygons looked like an area model, so were they thinking about the angles or thinking that the area of the triangle is 180?

In the next activity, I really wanted to focus on students composing and decomposing the angles themselves. They worked in groups to find the angle measures of the remaining polygons on the above sheet. Here are a few of their proofs that we shared as a class.

IMG_8458 IMG_8459 IMG_8460  IMG_8462IMG_8461

After sharing our proofs today, I felt very comfortable with student understanding of finding missing angles and thought it would be interesting to move into construction of these shapes in Hopscotch (a coding app). This is one of those things that is not explicitly in the curriculum, but something I just think is so great for students to explore. It is wonderful for students to see angles as turns and explore supplementary, interior and exterior angles.

We practiced making a square together to be sure everyone had an understanding of how the codes worked and then I sent them off to build the triangles. You can imagine the surprise as they punched in 60º for the turn to make an equilateral triangle and the character shot off in the wrong direction. I let them work their way through it and then reflect in their journals after. Here are some of their thoughts…

IMG_8451 IMG_8452 IMG_8453 IMG_8454 IMG_8455 IMG_8456

They left me with so much to think about for Monday’s lesson. I love the idea of a negative number makes them turn the other direction, the relationships to 180º, and the two angles adding up to 180º. Interesting stuff!

-Kristin